
Install and set up
This guide takes you from the App Store listing to a live Skin Test. Each step maps to a page in the app sidebar (Apps → Dermaself).
Time: 20–30 minutes for a small catalog. You can publish with the defaults and refine later.
Install
- Open Dermaself: AI Skin Analysis on the Shopify App Store and click Install.
- If your account can access more than one store, check the store selected in Shopify’s store picker before you confirm. The app is installed on that store only.
- Review the permissions and confirm. The app also asks for access to discounts: it needs it for the recommended discount.
- The app opens on Home. There is no plan to pick: every shop starts on Free (25 analyses a month). You can change plan later from Subscription, see Plans and usage.
App pages
| Page | What it does |
|---|---|
| Home | Quick Skin Test KPIs |
| Theme & Branding | Widget colors, font, logo, translations |
| Skin Test Setup | Questions, contact step, results page |
| Product Category Mapping | Which module (cleanser, serum, SPF…) each product is |
| Routine Composition | Which modules appear in morning, evening and extra routines |
| Field Mapping | Where INCI lives in your Shopify fields; saving it syncs the catalog |
| Recommended Discount | Discount code only on recommended products |
| Integrations | Klaviyo and Mailchimp |
| Publish | Turns the Skin Test on or off for shoppers |
| Subscription | Plan, usage, extra analyses |
| Analytics | Funnel, questions, attributed revenue |
1. Map your products — Product Category Mapping
With no mapping, the Skin Test has nothing to recommend. Every product you want in the results needs one Dermaself module (Cleansing, Serum, SPF, Night Cream, …).
- Open Product Category Mapping.
- Pick a module for each product.
- Save. The products you changed are queued. On first setup the sync only starts after you save Field Mapping (step 2): until then the products stay queued, which is expected.
Mapped-product caps: 100 on Free and Start, 200 on Pro, unlimited on Enterprise. Full guide: Product Category Mapping.
2. Map the fields and sync the catalog — Field Mapping
This step is required: saving this page is what syncs your catalog with Dermaself. Matching reads the composition (INCI) from your Shopify product fields and metafields.
- Open Field Mapping.
- Check the fields already connected with the Auto badge (title → product_name, vendor → brand, variant barcode → ean, variant price → best_price). They are suggestions and only apply when you save.
- Connect the field or metafield that holds the INCI to composition. It is the most important field for matching and it is not suggested automatically.
- In Field view choose All fields and connect FeaturedImageUrl to image_url: it is not suggested automatically and does not show in the Essential view.
- Click Save mappings. The sync starts for every product you assigned a module to in step 1.
- Stay on the page: the Sync status banner goes from Queued to In progress and Almost done. The sync is finished when it shows Completed and Last sync with a date and time. The page is locked while it runs; how long it takes depends on how many products you mapped.
If the banner shows Error, click Save mappings again. If the error stays, write to support@dermaself.it.
Full guide: Field Mapping and sync.
3. Check the questionnaire — Skin Test Setup
- Open Skin Test Setup.
- On Free the default quiz is used: you can change some settings and the step backgrounds. On Start and Pro you can also add, remove, reorder and edit questions, answers and the results page.
- Turn on the contact step if you want leads in Klaviyo or Mailchimp.
- Click Save setup.
Full guide: Quiz builder.
4. Compose the routines — Routine Composition
- Open Routine Composition.
- Choose which routines show in the results and which modules each one contains; drag to reorder.
- Save.
Full guide: Routines.
5. Match your brand — Theme & Branding
- Open Theme & Branding.
- Theme tab: colors, font, logo (PNG, JPG or WebP, max 512 KB).
- Translations tab: review the copy shoppers see, per language.
- Save changes.
The storefront button is styled in the theme editor, not here. Full guide: Design and branding.
6. (Optional) Discount on recommendations — Recommended Discount
Turn on a code that discounts only the products added from the recommendations. Full guide: Recommended discount.
7. (Optional) Leads and recap email — Integrations
Connect Klaviyo or Mailchimp and save a list. They are not required for the Skin Test to run. Full guide: Integrations.
8. Add the Skin Test to your theme
Turn on the Skin Test loader app embed in the theme editor and save the theme. It adds a floating Skin Test button to every page. You can also place a button inside a page or use a menu link.
Step by step: Add the Skin Test to your theme.
9. Publish — Publish
- Open Publish.
- Click Publish. The Skin Test is now on for shoppers.
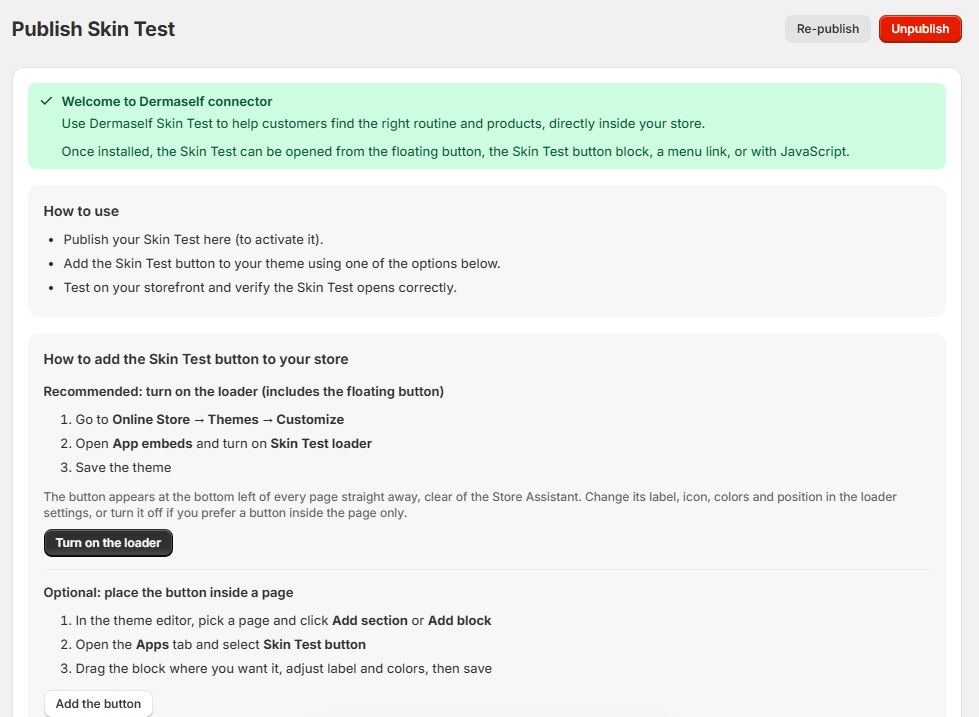
The Publish page also has shortcuts to turn on the loader and to add the button in the theme editor.
Unpublish takes the Skin Test offline: the button stays in the theme, but shoppers see that the Skin Test is unavailable.
10. Test it on the storefront
- Open your store in a private (incognito) window, on desktop and on mobile.
- Click the Skin Test button. The Skin Test opens in a few moments.
- Go through consent → quiz → selfie (camera or upload) → results → Your routine.
- Add a product to the cart and go to checkout. If the recommended discount is on, it is applied automatically.
What shoppers see: Shopper experience.
11. Check the numbers — Home and Analytics
- Home: KPI snapshot (completion rate, purchases from recommendations, attributed revenue, recommended products in cart).
- Analytics: the funnel on every plan; questions, revenue and more filters on Start and Pro.
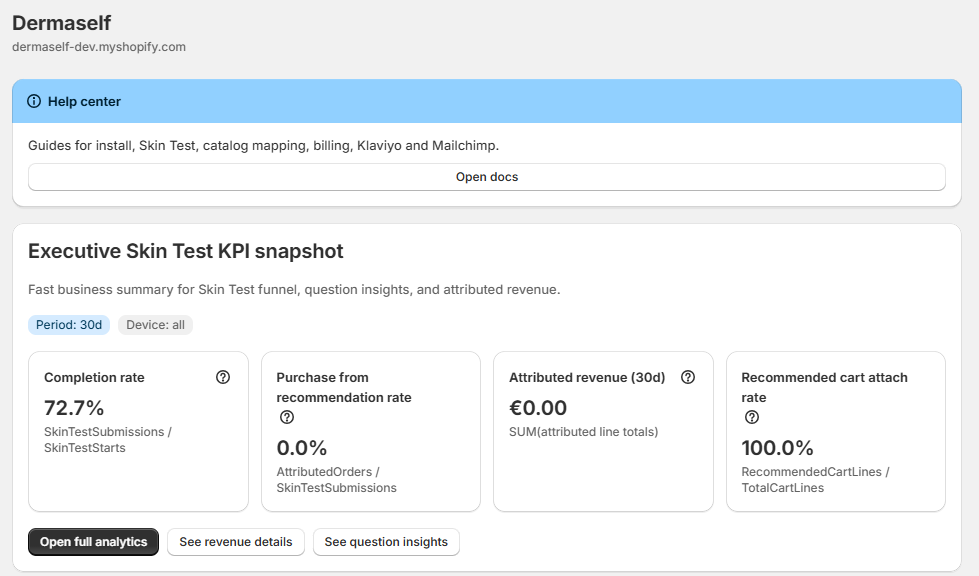
Guide: Analytics.
Troubleshooting
| Problem | What to check |
|---|---|
| The app is on the wrong store | The install was confirmed with another store selected in the store picker. Uninstall it there (Settings → Apps and sales channels) and install again from the listing with the right store selected. |
| A staff member cannot install | They need permission to install apps and the Discounts permission. Ask the store owner. |
| No button on the storefront | The Skin Test loader app embed is off, or the theme was not saved after turning it on. Check the published theme. |
| Loader on, but no floating button | Show floating Skin Test button is off in the loader settings. Turn it on, or add the Skin Test button block. |
| Two buttons on the page | The floating button and a Skin Test button block are both on. Turn off Show floating Skin Test button if you keep the block. |
| The routine shows no products | Field Mapping was never saved (no sync), no product has a module on Product Category Mapping, or the sync is not Completed yet. Assign modules, click Save mappings and wait for Completed. |
| On Product Category Mapping the sync stays queued | Field Mapping was never saved. Open it and click Save mappings: the sync then starts on its own. |
| The Skin Test shows as unavailable | It is unpublished (click Publish), the Free plan used its 25 analyses for the month, or the plan is not active. Check Subscription. |
Checklist
- App installed on the right store
- Products mapped on Product Category Mapping
- Save mappings clicked on Field Mapping (INCI connected to composition, FeaturedImageUrl to image_url) and banner shows Sync status: Completed
- Quiz settings saved on Skin Test Setup
- Routines saved on Routine Composition
- Colors and logo saved on Theme & Branding
- Skin Test loader on and theme saved (plus a button block, if you want one)
- Publish clicked
- One test Skin Test on the live store, desktop and mobile
- (Optional) Recommended discount active
- (Optional) Klaviyo or Mailchimp Ready to send
Support: support@dermaself.it.