
Tab-by-tab setup guide
This is the operational guide after you install from the App Store. Follow the app tabs left to right: each step below maps to a real screen.
Time: 20–30 minutes for a small catalog. You can publish with defaults and refine later.
What you are setting up
Dermaself adds a Skin Test to your storefront. Shoppers answer a quiz, can take a selfie, and get a routine built from your Shopify products (not a Dermaself catalog).
Recommended order:
- Plan on Subscription
- Catalog on Product Category Mapping + Field Mapping
- Questionnaire on Skin Test Setup
- Routines, design, discount (optional)
- Publish + theme embed
- Check the storefront and Analytics
Klaviyo / Mailchimp are not required for the Skin Test to run.
App tabs
The App Bridge nav, in order:
| Tab | What it does |
|---|---|
| Home | Quick Skin Test KPIs |
| Theme & Branding | Widget colors, logo, copy |
| Skin Test Setup | Questions, contact step, results page |
| Product Category Mapping | Which module (cleanser, serum, SPF…) each product is |
| Routine Composition | Which modules appear in morning / evening / extras |
| Field Mapping | Where INCI lives in Shopify metafields, then sync |
| Recommended Discount | Discount code only on recommended products |
| Integrations | Klaviyo and Mailchimp |
| Publish | Turns the Skin Test on for the shop |
| Subscription | Plan and usage |
| Analytics | Funnel, drop-off, attributed revenue |
1. Install and pick a plan — Subscription tab
- Install Dermaself from the App Store and open the app in Shopify admin.
- Go to Subscription and pick a plan (Free is enough to start). On development stores, paid plans can be tested without a real charge.
- Without an active plan, Publish stays blocked: the Skin Test will not go live.
Quotas: Free 10 analyses / 20 mapped products; Start 300 / 60; Plus 500 / 150; Growth unlimited. Details in Plans and usage.
2. Connect the catalog — Product Category Mapping tab
With no mapping, the Skin Test has nothing to recommend. Every SKU you want in results needs one Dermaself module (Cleansing, Serum, SPF, Night Cream, …).
- Open Product Category Mapping.
- Pick a module from the dropdown for each product.
- Save. Mapped-product caps depend on the plan (20 / 60 / 150 / unlimited).
Unmapped products stay in your Shopify catalog but never enter a routine.
Full guide: Product mapping.
3. Tell the app where INCI lives — Field Mapping tab
Matching does not scan a label on the storefront: it reads composition from your Shopify metafields.
- Open Field Mapping.
- Map at least the ingredients / INCI field (and other product fields you use).
- Run sync.
- The app normalizes ingredients (COSING reference) and scores product × skin.
If INCI is missing or sits in an unmapped metafield, that product matches weakly (or not at all). After a bulk catalog change, run sync again.
Full guide: Catalog sync.
4. Configure the questionnaire — Skin Test Setup tab
This is what shoppers see before analysis.
- Open Skin Test Setup.
- In Skin Test questions, add, reorder, edit, or hide questions.
- Open Contact step (name, email, marketing consent) if you want Klaviyo/Mailchimp leads: without consent, nothing syncs.
- In Skin Test settings, choose progress indicator, results page, recommendations, and alternative products per step.
- Click Save setup. Skin Test Preview on the right shows the flow without republishing the theme.
Quiz copy is stored per language (IT / EN). The storefront follows the shop language.
Full guide: Quiz builder.
5. Compose morning and evening — Routine Composition tab
- Open Routine Composition.
- For Morning routine, Evening routine, weekly, makeup, and behaviours: turn on Show this routine in the widget if it should appear in results.
- Add modules (categories) in each routine and drag to reorder steps.
- Save. Restore defaults resets factory composition.
The Skin Test fills those slots with mapped products, based on the analysis. This is not “frequently bought together”.
Full guide: Routines.
6. Match the widget to your theme — Theme & Branding tab
- Open Theme & Branding.
- Template tab: primary colors, backgrounds, text, border radius, font.
- Upload the logo as PNG, JPG, or WebP (no SVG: some email clients skip it in the recap).
- Button tab: IT/EN storefront button labels, colors, radius.
- Translations tab: Next, Previous, privacy copy, error messages.
- Save. Live preview is on the same page.
“Powered by Dermaself” is hidden only on Growth. See Design and branding.
7. (Optional) Discount only on recommendations — Recommended Discount tab
- Open Recommended Discount.
- Enable the code.
- Set the code (letters and numbers) and percentage 1–100%.
- Save. The Discount Function is already included in the public app.
The discount applies only to cart lines that came from Dermaself recommendations. Everything else stays full price. The widget can auto-apply the code at checkout.
Full guide: Recommended discount.
8. (Optional) Leads and recap email — Integrations tab
The app connects only to Klaviyo and Mailchimp. There are no native connectors for Flow, GA, Meta Pixel, Zapier, or Omnisend.
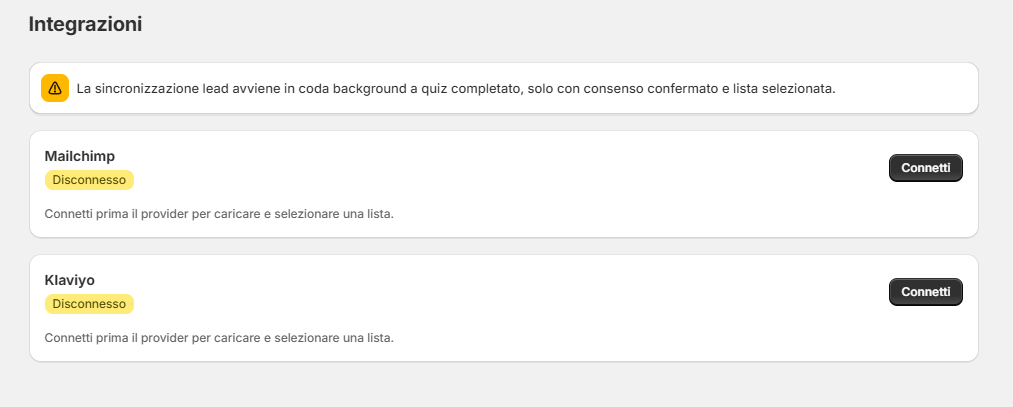
Integrations tab: Connect the provider, then pick a list. With no saved list, leads do not sync.
Klaviyo, in sequence
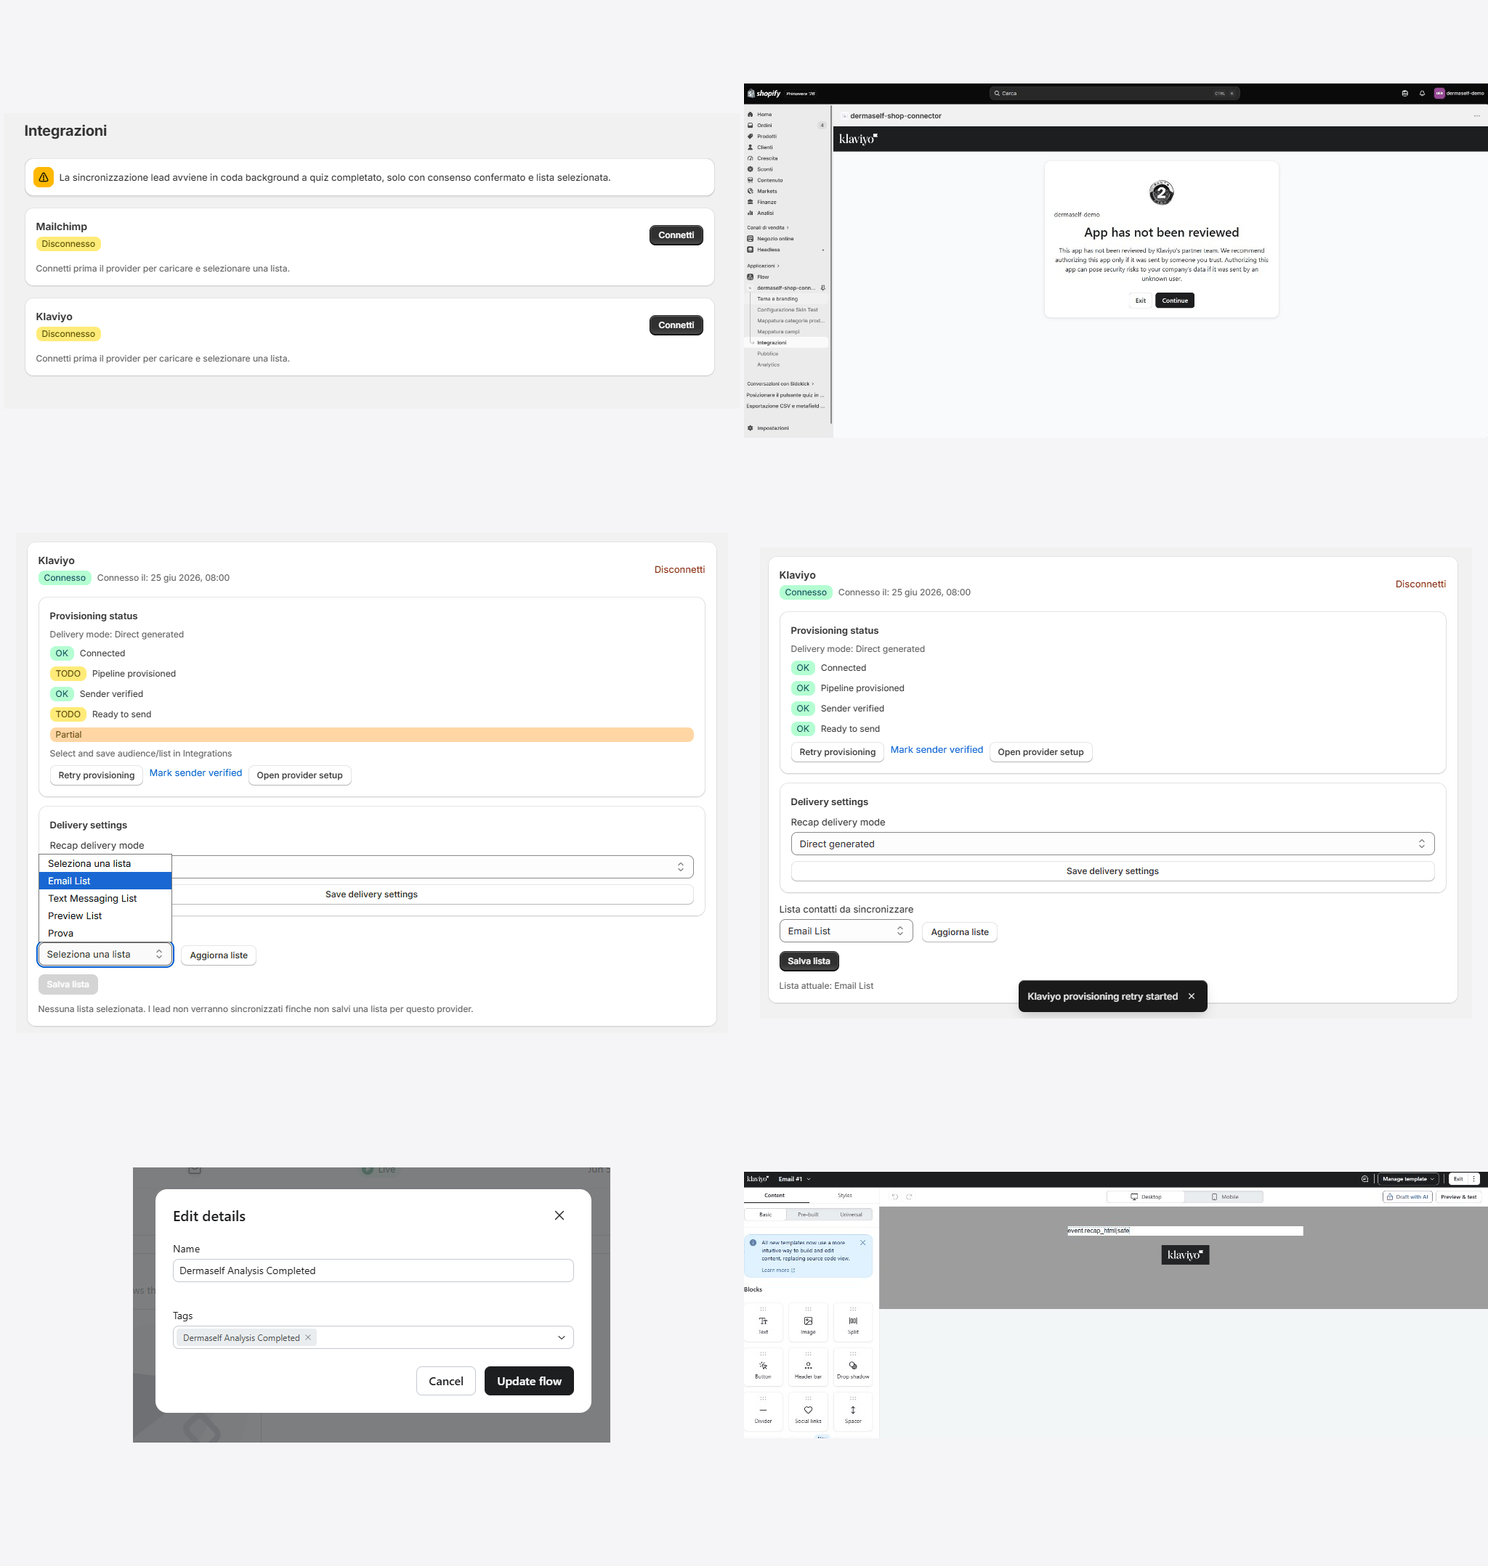
- Connect → in Klaviyo click Continue if you see “App has not been reviewed” → Allow.
- Refresh lists, pick a list, Save list.
- Fill sender and domain; after SPF/DKIM click Mark sender verified.
- In Klaviyo, create a flow triggered by Dermaself Analysis Completed and drop in the recap HTML.
- When all four indicators are green (Ready to send), run a test Skin Test with your email and consent checked.
Full guide: Klaviyo.
Mailchimp, in sequence
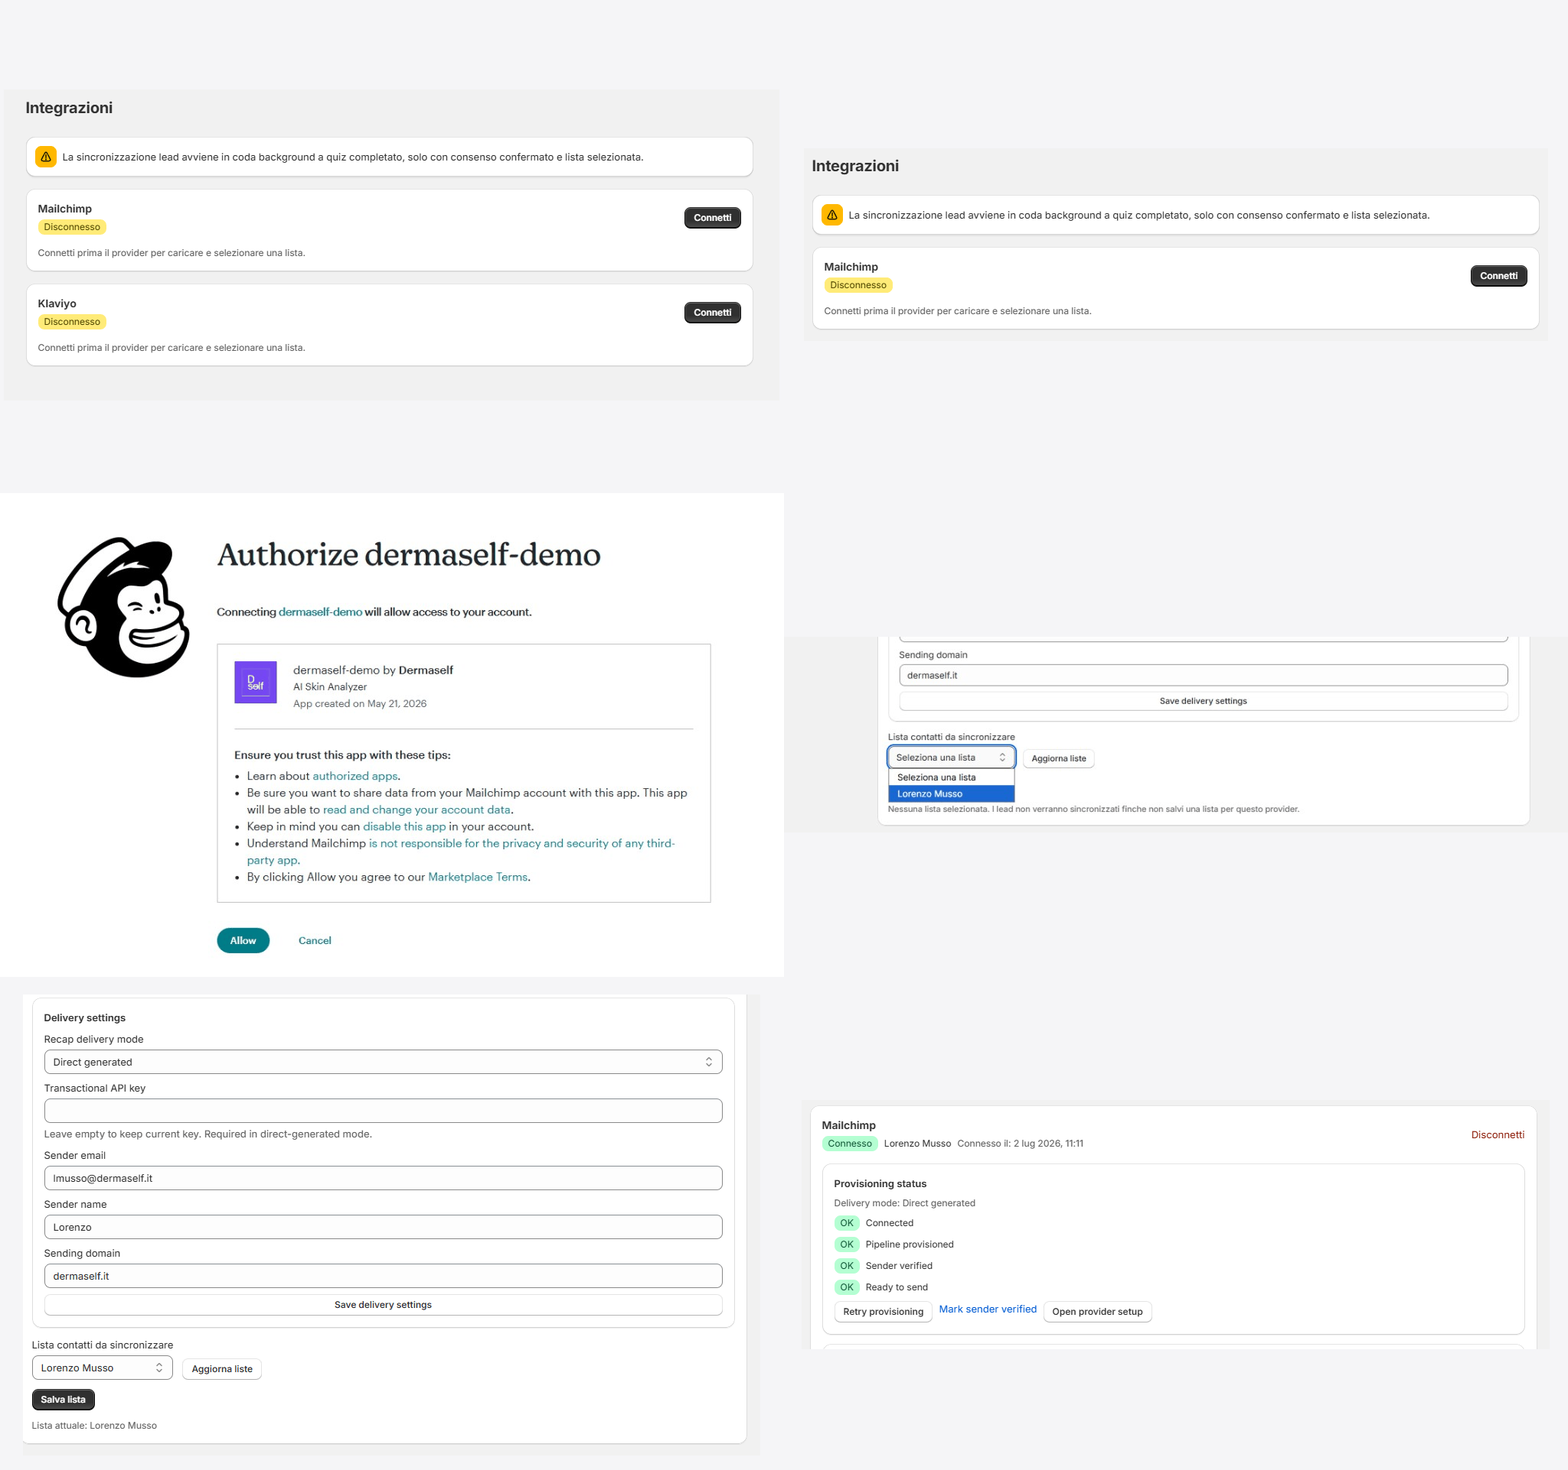
- Connect → Allow.
- Pick the audience and Save list.
- Delivery: Direct generated, sender, domain, Transactional API key (Mandrill).
- Save delivery settings, then Mark sender verified.
- Four green OKs = recap ready. Without Mandrill the contact is saved but the email does not send.
Full guide: Mailchimp.
9. Publish and turn on the embed — Publish tab
Two separate actions:
- Publish in the app = the Skin Test is on for this shop.
- App embed in the theme = the loader (and button) live in the theme and are saved.
A. Click Publish
- Open Publish.
- Click Publish. If the plan is inactive, the button stays blocked.
B. Turn on Skin Test loader in the theme
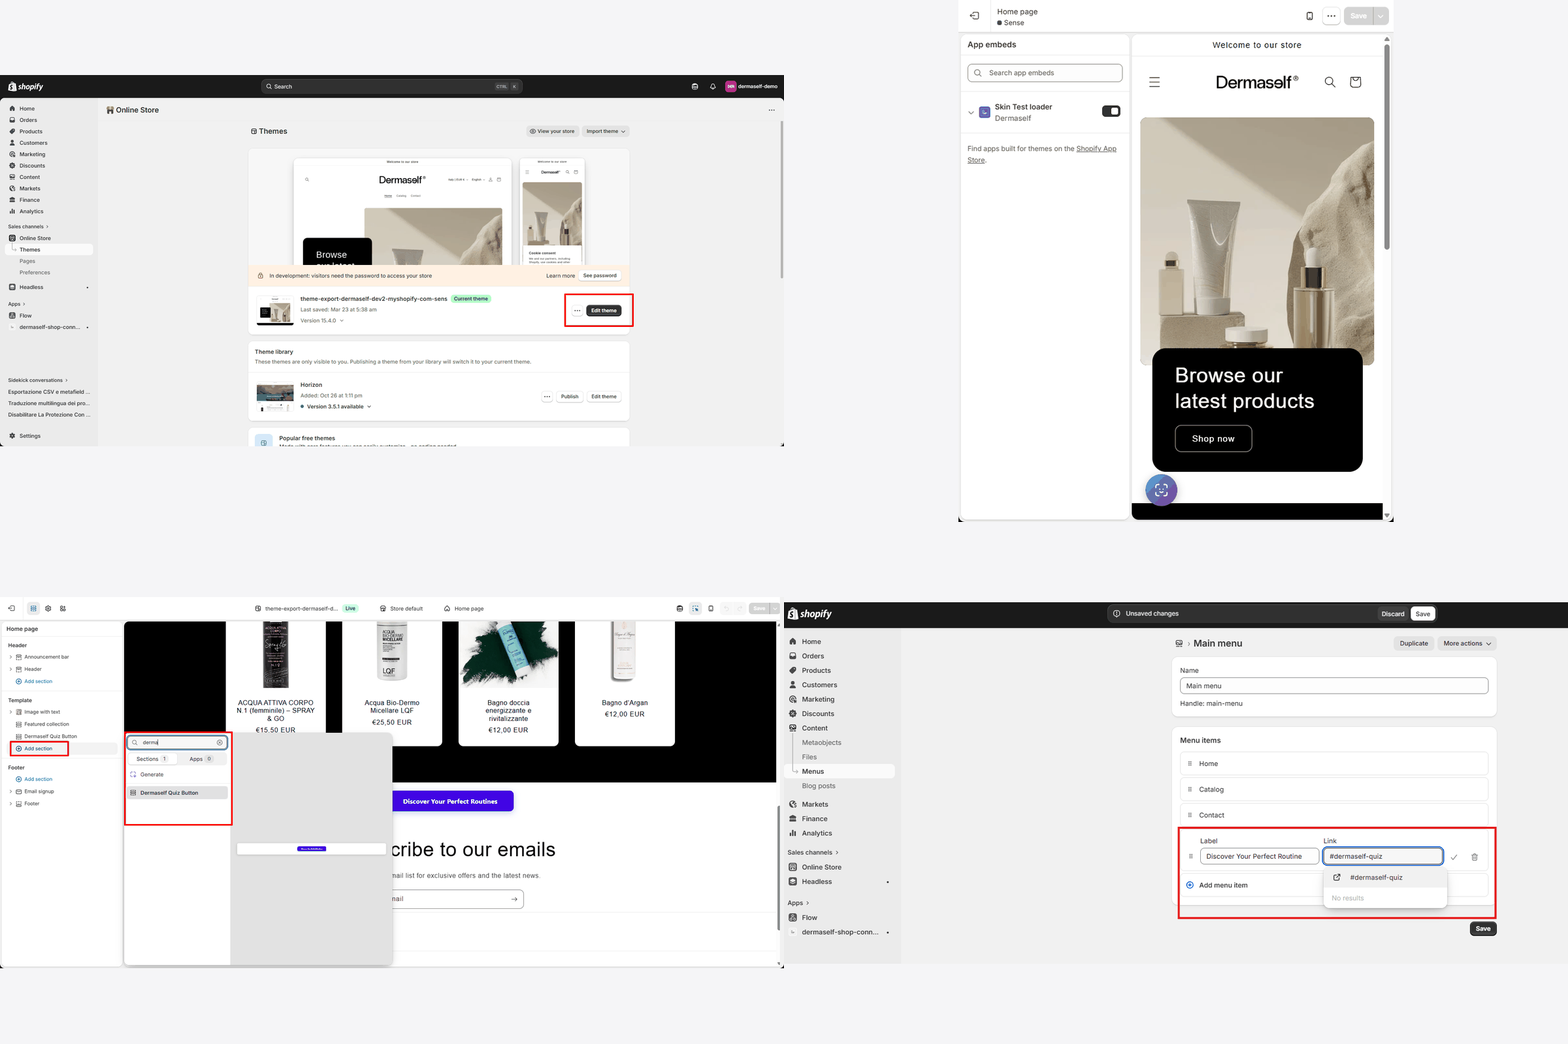
- Online Store → Themes → Edit theme.
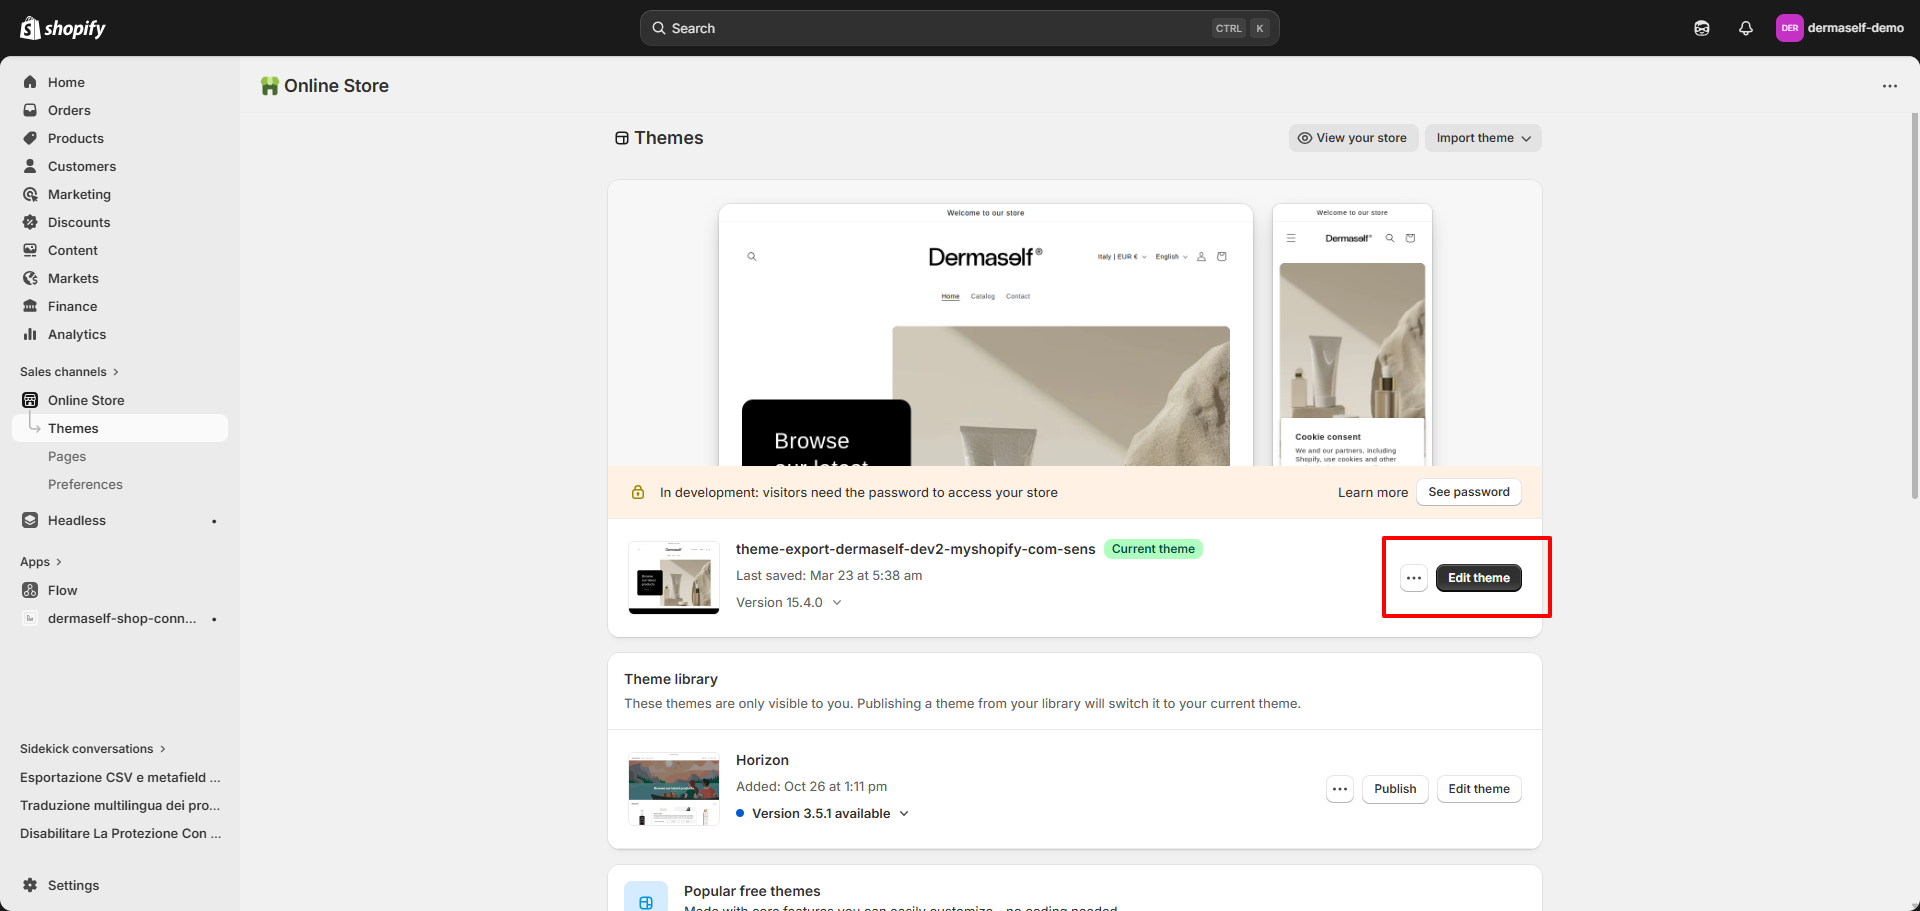
Shopify Admin → Online Store → Themes: open the published theme editor.
- In the editor left nav, open App embeds.
- Enable Skin Test loader (Dermaself) and click Save.
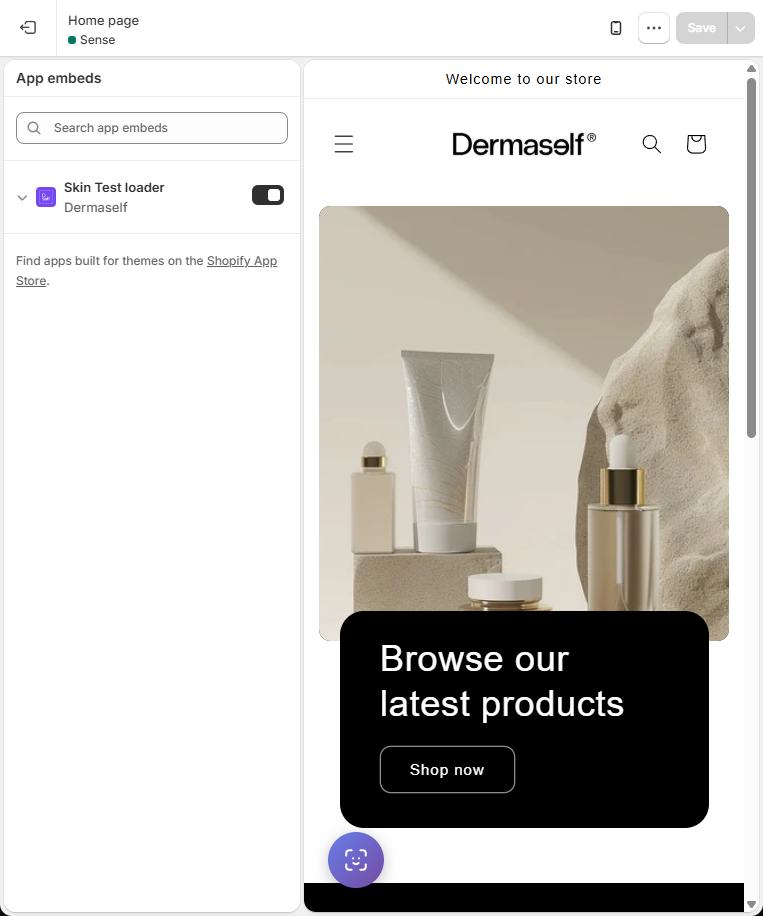
App embeds: Skin Test loader toggle ON. Preview shows the purple button at the bottom left.
C. (Optional) Button inside a page
For a button on homepage, product, or collection:
- In the editor: Add section / Add block → search
derma. - Add Dermaself Quiz Button (or Skin Test button).
- If you do not want two buttons, turn the floating button off in the loader.
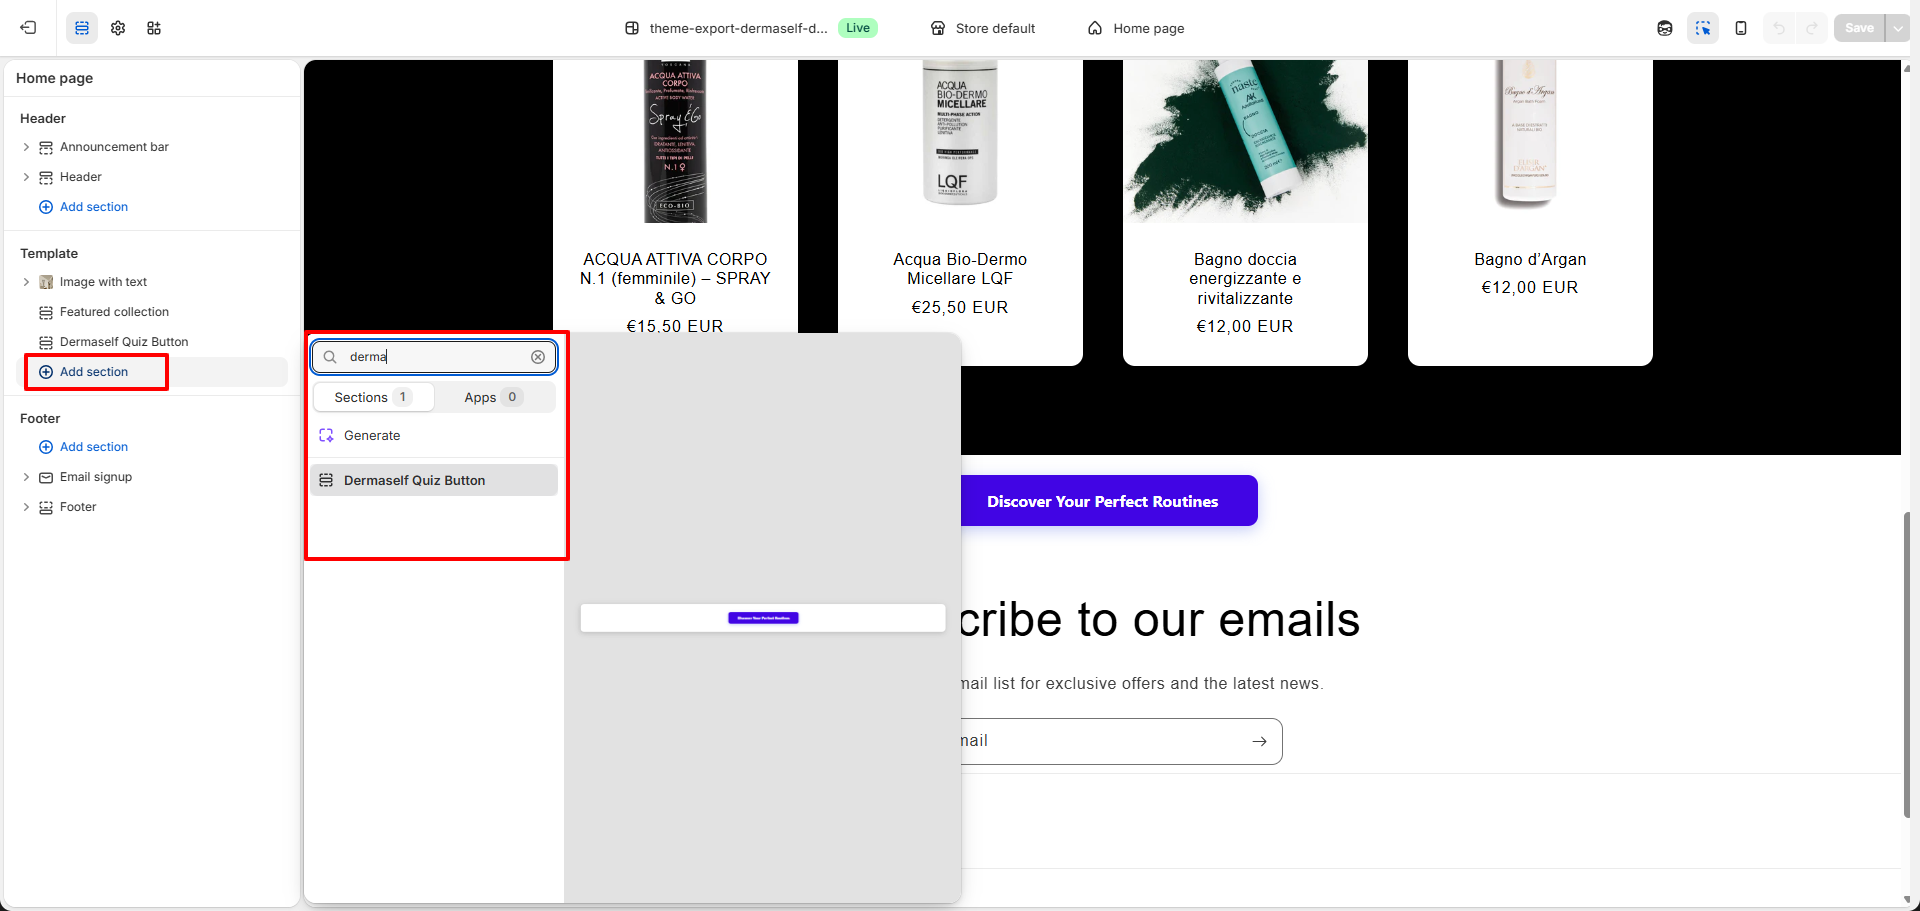
Add section → search “derma” → Dermaself Quiz Button.
D. (Optional) Menu item
- Content → Menus → Main menu.
- Add an item with link
#dermaself-quiz(the loader opens the Skin Test).
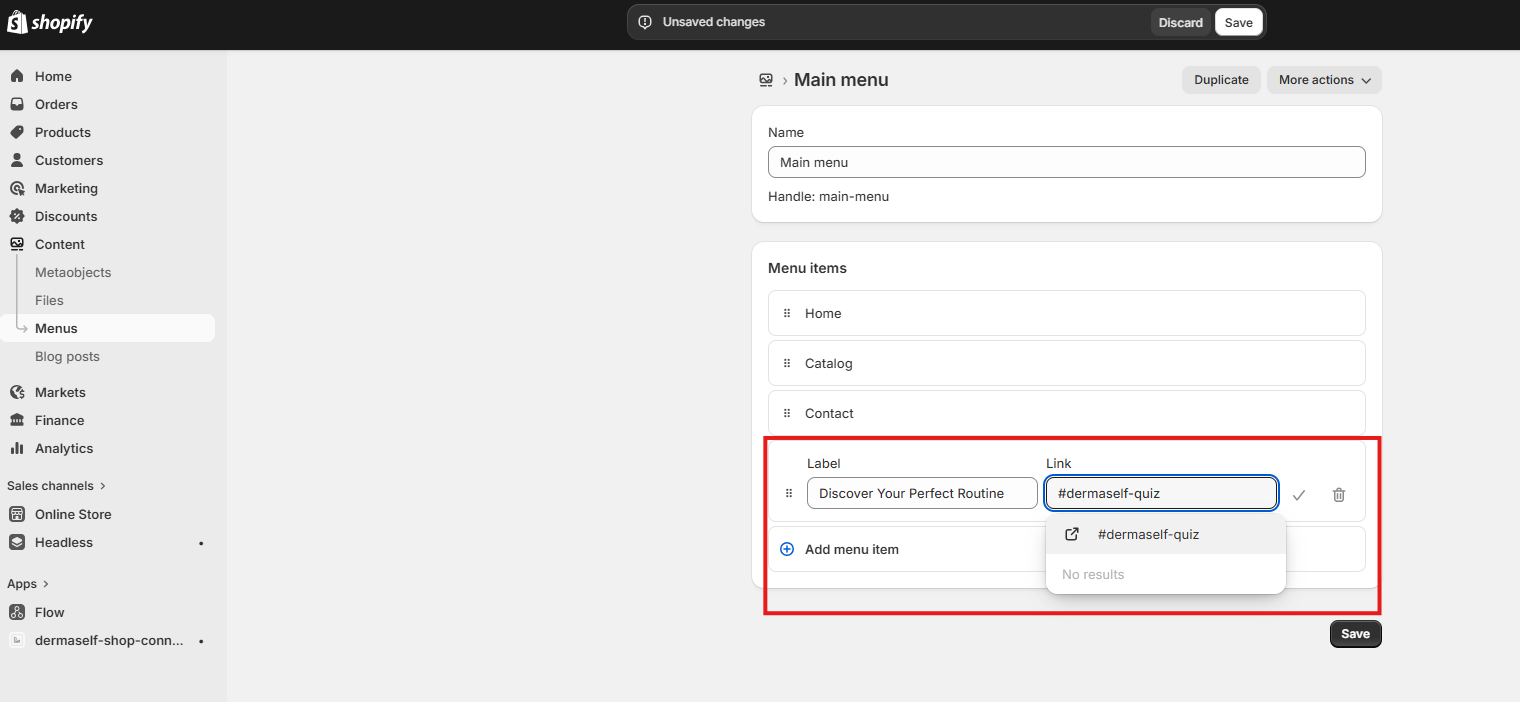
Any label, exact link #dermaself-quiz.
10. Try it on the storefront
- Open the shop (not admin).
- Click the Skin Test button.
- Complete consent → quiz → selfie (camera or upload).
- Check routine and products.
- The session should appear in Analytics.
If the button is missing: the theme was not saved after the embed, or Publish was not clicked.
What shoppers see, step by step: Shopper experience.
11. Check the numbers — Home and Analytics tabs
- Home: KPI snapshot (completion, purchases from recommendation, attributed revenue, cart attach).
- Analytics: funnel, drop-off by step, recommended vs purchased products, period/device filters, PDF export.
Guide: Analytics.
Quick checklist
- Plan selected on Subscription
- Products mapped (module) on Product Category Mapping
- INCI mapped and sync run on Field Mapping
- Quiz and contact step saved on Skin Test Setup
- Visible routines saved
- Logo/colors saved on Theme & Branding
- Publish clicked
- Skin Test loader ON + theme saved
- One test Skin Test on the storefront
- (Optional) Klaviyo or Mailchimp Ready to send
Support: support@dermaself.it.